Deploying Static Sites on AWS with Terraform
Recently I’ve had to deploy a couple of client-side web applications to the web, and my cloud provider of choice is AWS. If you are familiar with the various tools provided by AWS, setting up a web stack through the console is straightforward. It may be tempting to depend on the UI, especially for something that is usually pretty static, but I highly recommend adopting Infrastructure-as-Code (IaC) principles and using a management tool. You’ll find that the simplicity in deploying new sites and regions is worth the upfront time in setting up your deployment, and it’ll be much easier to manage.
If you are a web developer or full-stack developer with little or no devops experience, you’ll find that this is a great way to get started. In this post, I’ll walkthrough managing your infrastructure with an open-source IaC tool called Terraform but these principles will apply with any other cloud agnostic tool, or AWS’s IaC tool, CloudFormation.
Terraform Introduction
Before I jump into how we’re going to deploy a static site, a brief introduction to Terraform is required to make sense of the code we’ll write. Terraform allows for engineers to write declarative code to create, modify and destroy cloud assets on various cloud platforms such as GCP, AWS and others. Instead of having to navigate a platform’s CLI or UI, we can write terraform files that can be version controlled and added to the CI/CD platform of your choice.
This makes for more maintainable cloud infrastructure - doing it without the IaC approach is the software developer’s equivalent of manually copying files with FTP or rsync to the production server. We are aiming for reliable and repeatable deployments, and continuously shipping infrastructure is a part of the modern stack.
Below is some sample code from their homepage. The syntax is straightforward and describes a running AWS instance with some attributes defined outside in another block. Different types of AWS (and other platform) resources and their definitions and syntax can be found in their documentation.
resource "aws_instance" "iac_in_action" {
  ami               = var.ami_id
  instance_type     = var.instance_type
  availability_zone = var.availability_zone

  // dynamically retrieve SSH Key Name
  key_name = aws_key_pair.iac_in_action.key_name

  // dynamically set Security Group ID (firewall)
  vpc_security_group_ids = [aws_security_group.iac_in_action.id]

  tags = {
    Name = "Terraform-managed EC2 Instance for IaC in Action"
  }
}
Once you have your infrastructure defined, Terraform gives you two CLI tools to
get your plan deployed. The plan operation compares your defined
infrastructure versus what’s currently there. In the same way that
configuration drift occurs in physical servers, it also happens in
your cloud infrastructure. Maybe an engineer makes a change without anyone
knowing, or a resource has new features launched. Either way, terraform plan
shares an execution plan where you can confirm the upcoming changes are
exactly what you want.
apply does exactly what you would expect, it will roll out that listed
execution plan across the resources as defined. I won’t be diving into
integrating these into continuous deployment workflows in this post, but basic
knowledge of the above will let you version control your static site in
preparation for automated deployments in the future. Now, onto the AWS
resources required to host a static site.
AWS Resources
Hosting a static website is a common and standard need for any business or developer, and AWS provides production-grade resources to standup a new site in minutes, so that developers don’t need to worry about reliability. I’ll highlight each of the components and explain how each is used in the toolchain.
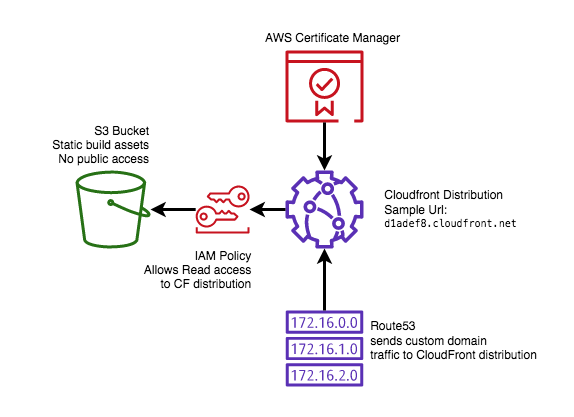
1. S3 Buckets
S3 buckets are the most critical resource, as they are responsible for storing your collection of images, Javascript, and HTML. S3 is AWS’s object storage offering, and it is essentially a giant key-value store that allows for users to reliably store objects of any size with a key, namespaced with buckets. Deploying a new release to your site will involve overwriting existing assets in this bucket.
2. CloudFront Distributions
CloudFront distributions are globally available content delivery networks (CDNs) that allow for the contents of a single S3 bucket to be distributed with low latency all over the globe, depending on the configuration. Do you want your content optimized for access in Asia? Managing that is a simple configuration change with CloudFront.
3. Route53 routes
Route53 is a DNS web service, that allows for you to programatically direct network traffic to internal and external assets with your domain name. We’ll use Route53 to direct traffic to our CloudFront distribution so that our static site uses our memorable domain name.
4. IAM Policies
IAM stands for Identity Access Management, and is AWS’s tool for managing secure platform access within their ecosystem. We will use this to prevent unauthorized access to our S3 bucket, so that the only way users access our content is through our CloudFront distribution. This prevents unauthorized access, and enforces the client requirements we will set in our CDN. We’ll write an IAM policy in our terraform code below.
5. AWS Certificate Manager
ACM helps us manage our SSL/TLS certificates for secured HTTPS access to our static site. While not always necessary for certain kinds of content, I’ll assume your site requires HTTPS, although deploying a site with HTTP only access is just as easy.
Prerequisites
There are two prerequisites assumed below, so you will have to modify the configuration plan accordingly, or manually configure these assets. The reason these are not contained below is that they are really static, and are much more “set-it and forget-it” than anything below. They can be automated as well, but I deemed it out of scope for this example.
First, this tutorial assumes you have an existing Hosted Zone created in Route53. For each unique domain you have, you’ll need a hosted zone. You don’t necessarily need to purchase a domain through AWS, but if you manage a domain through another domain provider like Namecheap, you’ll have to configure their portal to point to the AWS name servers provided after you have a hosted zone created. You will also need the hosted zone id once you have it setup.
Second, I’m assuming you have a valid SSL/TLS certificate created through ACM.
You can create one with a wildcard to your domain, such as
*.customdomain.com, and this will allow you to use the same certificate in
all future subdomain static sites. Keep track of the ARN that comes with
that certificate.
Writing the Plan
With all of that out of the way, we can get into the details and look at what such a plan will look like. I’ve pasted the entire plan below as well as in this this gist.
The parts that should be overriden by your own config are in the <> brackets,
and the brackets should also be replaced by whatever text or variable is
specified. The region can also be changed, I just defaulted to us-east-1.
The locals block allows for you to parameterize variables that get referenced
in multiple places later on. These could also be converted to
input variables so that they can be dynamically set as well.
The amount of CloudFront distribution parameters would take a full blog post to
cover all of the details. I selected some sane defaults for this
distribution: it requires HTTPS, uses PriceClass_100, which caches your
content in NA and EU (cheapest option), and uses some standard caching values.
terraform {
  required_providers {
    aws = {
      source  = "hashicorp/aws"
      version = "3.19.0"
    }
  }
}

provider "aws" {
  # region can be overriden, parameterized if desired
  region = "us-east-2"
}

# PARAMETERS, certificate and hosted zone id required
locals {
  s3_origin_id = "myS3Origin"
  certficate_arn = "<certificate_arn_here>"
  dns_zone_id = "<hosted_zone_id>"
}

# s3 bucket configuration
resource "aws_s3_bucket" "bucket" {
  bucket = "<your_bucket_name_here>"
  acl    = "private"

  website {
    # change this if you have something like root.html or home.html configured instead
    index_document = "index.html"
  }

  # feel free to modify tags for your own use, used for cost analytics
  tags = {
    Service = "<service_name>"
    Operation = "app-hosting"
    Environment = "prod"
  }
}

# cloudfront principal identity for s3 access
resource "aws_cloudfront_origin_access_identity" "s3_access_identity" {
  comment = "Cloudfront user for S3 bucket access."
}

# cloudfront distribution configuration
resource "aws_cloudfront_distribution" "s3_distribution" {
  origin {
    domain_name = aws_s3_bucket.bucket.bucket_regional_domain_name
    origin_id = local.s3_origin_id

    s3_origin_config {
      origin_access_identity = aws_cloudfront_origin_access_identity.s3_access_identity.cloudfront_access_identity_path
    }
  }

  enabled = true
  is_ipv6_enabled = true
  comment = "Host for Blog"
  default_root_object = "index.html"

  # logging_config {
  #   include_cookies = false
  #   bucket          = "mylogs.s3.amazonaws.com"
  #   prefix          = "myprefix"
  # }

  aliases = ["<domain desired here, ex: blog.customdomain.com>"]

  default_cache_behavior {
    allowed_methods  = ["DELETE", "GET", "HEAD", "OPTIONS", "PATCH", "POST", "PUT"]
    cached_methods   = ["GET", "HEAD"]
    target_origin_id = local.s3_origin_id

    forwarded_values {
      query_string = false

      cookies {
        forward = "none"
      }
    }

    viewer_protocol_policy = "allow-all"
    min_ttl                = 0
    default_ttl            = 3600
    max_ttl                = 86400
  }

  restrictions {
    geo_restriction {
      restriction_type = "none"
    }
  }

  price_class = "PriceClass_100"

  viewer_certificate {
    acm_certificate_arn = local.certficate_arn
    ssl_support_method = "sni-only"
  }

  tags = {
    Service = "<your_service_name>"
    Operation = "cdn"
    Environment = "prod"
  }
}

# json policy for cloudfront -> s3 access
data "aws_iam_policy_document" "s3_policy" {
  statement {
    actions = ["s3:GetObject"]
    resources = [
      "${aws_s3_bucket.bucket.arn}/*"
    ]

    principals {
      type = "AWS"
      identifiers = [ aws_cloudfront_origin_access_identity.s3_access_identity.iam_arn ]
    }
  }
}

# iam policy
resource "aws_s3_bucket_policy" "s3_read_access" {
  bucket = aws_s3_bucket.bucket.id
  policy = data.aws_iam_policy_document.s3_policy.json
}

# dns route to cloudfront
resource "aws_route53_record" "app_route" {
  zone_id = local.dns_zone_id
  name = "blog.customdomain.com"
  type = "A"

  alias {
    name = aws_cloudfront_distribution.s3_distribution.domain_name
    zone_id = aws_cloudfront_distribution.s3_distribution.hosted_zone_id
    evaluate_target_health = false
  }
}
Once you have a plan that you are happy with, you can test it out using
terraform plan to get a full list of what will happen, and deploy it using
terraform apply if nothing errors out.
Deployments
All that is required to deploy updates to your static site is to sync your desired build directory to the S3 bucket, and then create an Invalidation in your CF distribution to let it know that the cached content needs to be refreshed from the S3 bucket.
For a quick and easy example of how I do this with this blog, see the following deployment script in this very blog that uses the AWS CLI to sync my build folder, and create the invalidation.
That script runs automatically with TravisCI so that each merge to my production branch is deployed without any effort.
Final Notes
On the topic of pricing: you might be intimidated by all the resources we’ve created in this post and wondering what kind of AWS bill you will incur at the end of the month. I can assure you that for the average site, AWS’s usage based pricing of S3, CloudFront and Route53 will be competitive to almost any alternative out there for hosting websites with a CDN. If you don’t believe me, make sure your tagging schema is set correctly, and use the Cost Explorer next month to see how little it costs. For reference, this site costs less than a cup of coffee a month to host.
With the rise of cloud platforms in the past decade, running infrastructure in the cloud has never been more accessible. I hope this gives you a peek into the power of IaC for your side project or business. If you have any questions, feel free to email or ask below, I’m always happy to help if I can.