Practical Nginx for Developers
For those of you who have never heard of Nginx, it’s a free, open-source, high-performance HTTP server and reverse proxy (taken from the Nginx docs). While Nginx advertises itself as a high-performance, production-grade application (which it is), it is also incredibly useful as a reverse-proxy. I’ll share about how I configure Nginx to route requests amongst my various projects.
If you’ve never heard of a reverse proxy before, let me give a brief introduction. Let’s say you are hosting a website on a small AWS instance you have spun up. You get a decent amount of traffic, and you don’t want people using your website to be able to find out the actual IP address of your server. A reverse proxy can stand in the public gateway of the internet and forward requests to your web server so that the outside world can’t find out the server that is actually responsible for the requests. I’ve included a diagram below so you can get a better idea of what I’m talking about:

Reverse proxies have many usages and advantages, but I use Nginx mostly for it’s ability to distribute incoming requests to several different servers. I have around 4 or 5 projects at any given time hosted on the internet, but I don’t need a dedicated EC2 instance for each of those - in fact, they could all run fine off of one box. The problem is, all of these projects are unique- among them static websites, node servers, Django api’s, and more. Not only that, but I also have different domain names and required paths for each of them. I’ll go through some of the different use cases and share some of the Nginx configs that have been helpful for me in quickly getting my projects online. As a note, all of the below configurations are examples of a single Nginx instance on the same server as all of my web applications. With this, you’ll be able to run multiple websites off of a single port on your Ubuntu instance.
Django Configurations
For those of you using Django, Nginx makes it easy to get a server pointed at a Django instance configured to run on localhost.
server {
    listen 80;
    server_name <domain_name>;

    location /static/ {
        root /home/user/path/to/django_repo;
    }

    location / {
        include proxy_params;
        proxy_pass http://unix:/home/user/path/to/django_repo/file.sock;
    }
}
In Nginx, this config is called a server block, and is a complete configuration that Nginx can use to distribute incoming requests. You can have many or just one, depending on what you are working on.
Let’s step through this and take a look at what is going on here. The first
directive: listen 80; is pretty clear, it is telling Nginx to listen on port
80 for this particular kind of request. The next line is crucial:
server_name is used to tell Nginx which server block to forward an
incoming request to. In your case, you can configure this as necessary.
I might have a line like server_name api.phizzle.space; or something similar.
The next three lines beginning with location /static/ { ... are used to help
incoming requests trying to find the static resources you’ve configured in your
Django application. Depending on how you configured Django and your static
assets, this might change. This little block grabs all incoming requests with
/static/ in the url path and forwards them to the static resources in your
Django application as necessary.
The next location block location / { ... catches all the rest of the incoming
requests. It preserves the url path and passes the request to the local unix
socket of your Django application. It preserves the parameters and sends the
HTTP packet as-is to the local Django server. The socket path here is
also different for each user, and it again depends on how you’ve configured
your Django application.
Node Server Nginx Config
Next, let’s look at how we can configure Nginx to forward requests to a Node http server we have running locally. Here is an example config:
server {
    listen 80;
    server_name <domain name>;

    location / {
    proxy_pass http://localhost:3000/;
    proxy_http_version 1.1;
    proxy_set_header Upgrade $http_upgrade;
    proxy_set_header Connection 'upgrade';
    proxy_set_header Host $host;
    proxy_cache_bypass $http_upgrade;
    }
}
This is a pretty simple configuration, and you’ll recognize the first two lines from the previous Django server block. These lines instruct Nginx which port to use, and which server block to forward incoming requests to.
The location / { .. block uses proxy_pass to forward the request onto the
node server running on localhost on port 3000. The rest of the http
configuration details are specifics I use based on my personal configuration.
proxy_pass should be enough to get you off the ground for now. As long as you
have a long-running instance of your node server running (forever is
decent at this), Nginx will easily be able to send requests to it.
Static Websites with Nginx
Not only is Nginx a great reverse proxy, it is also a very useful HTTP server that can deliver static files on your machines. It’s pretty simple, and here is the config that can help you do that:
server {
  listen 80;
  server_name <domain_name>;

  root /home/user/path/to/static/website;
  index home.html;
}
As shown above, the first two lines of the server block serve only to
differentiate incoming requests. The important lines are the last two that
make use of root and index. The root directive allows for you to set the
directory on your machine that you would like to serve your static assets from.
index then allows for you to specify the root html page of your site.
As long as your anchor tags have the right relative paths, the rest of
your site should work. This is a pretty simple configuration but it should get
you off the ground for delivering a basic website.
Multiple Server Blocks
One of the great things about Nginx is that you can combine multiple server
blocks together to set up some pretty complicated scenarios. While you can
include one giant file in your Nginx sites-enabled directory, I prefer to
have multiple small files for each service, each with their own server block.
This makes it easier to add new configurations and manage your configuration
files, especially if you use symlinks.
While every scenario is different, here is a diagram of my server configuration.
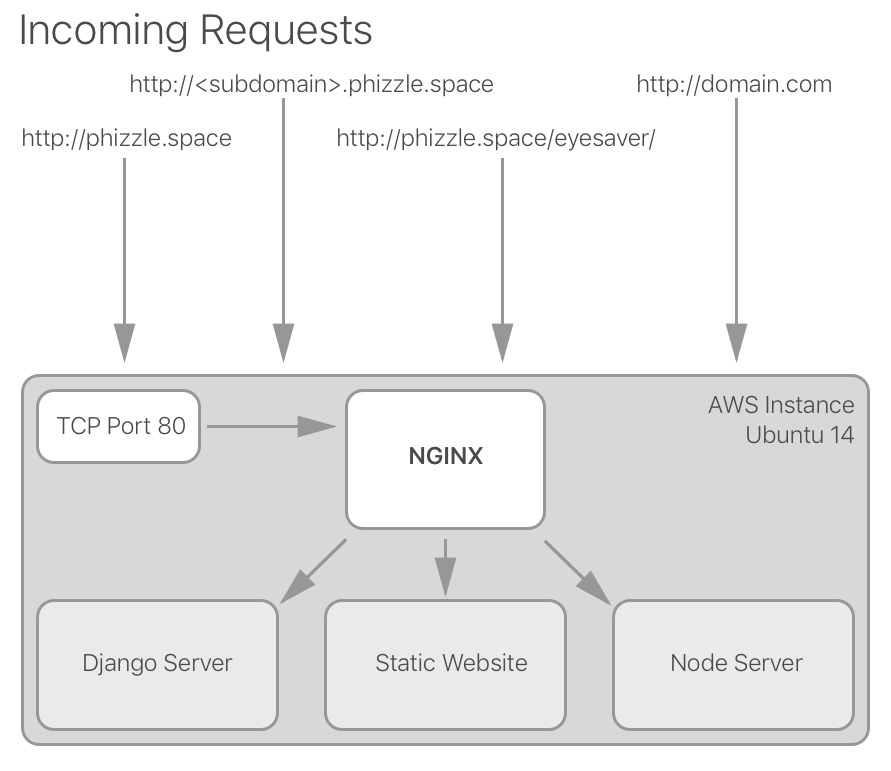
I have four different server block configurations to filter incoming requests and forward them to one of the three services I have on my Ubuntu machine. As I expand and test out new projects and ideas, it’s pretty easy for me to add a new server block for them.
Closing
Hopefully this gives you some ideas on how you can use some of
Nginx’s powerful features for hosting your work. If you are completely new to
Nginx, I recommend checking out a beginner’s guide. If you run into
issues, 1) check /var/log/nginx/error.log and 2) make sure you’ve run nginx
-s reload or its equivalent.
Happy hacking!