Building a Desktop Linux PC
For the past 7 years, I’ve almost exclusively lived off 3 different laptops that I’ve owned. Between the three of them, I’ve used one Windows 7 machine, and two OSX laptops. The OSX laptops have been the most reliable and common ones that I’ve used for development the past 5 years. The Windows laptop died a few years into usage and I haven’t touched it since. In the meantime, I’ve wanted to work on getting a home network setup with NAS and various other utilities. To set all that up, a Linux home base has been a prerequisite for a while. Over the holidays, I found some good deals on some parts I’ve been waiting for, so I decided to spring on it.
goals
This desktop build is meant to satisfy a relatively narrow set of use-cases. My parts list and setup will optimize for the uses listed below.
What it’s meant to do:
- Run 24/7 with very high reliability
- Handle multiple storage drives for dual-boot, potential NAS storage
- Transcribe signals from analog video to digital formats
- Be accessible from trusted devices in the local network
What it’s not meant to do:
- Play games that require lots of computing power
- Mine cryptocurrencies
the build
Building the PC in total took me about 2 hours for the physical setup and testing, and another hour to get Linux set up as I wanted. At the time of writing, I have used these components only for a short time, so I cannot give a proper review. I plan on following up 6- 12 months from now with a review based on what I’ve experienced.
parts list
One of my unstated goals was to finish the build for under $500, and my parts below at the time of writing cost in total about $485. You might be able to find these cheaper depending on how prices change over time. The links below are also not sponsored in any way, so please just use them as a reference.
CPU: AMD Ryzen 3 2200G
- includes on-board graphics
- cheap workhorse CPU
- if using an external PCI GPU, only uses PCI x8 mode even if your GPU supports x16. I’ve heard this is not a big deal, but just in case you care about maximizing your performance, I would do your research.
Motherboard: MSI B450 Tomahawk ATX AM4
- I sprung for the B450 over the B350 because of the support for more SATA III connections. Other than a few minor USB configuration differences, they are mostly the same. If you have a really old CPU, there might be some compatibility issues that are worth upgrading to the B450. At the time, there was a $10 difference, so I decided to upgrade.
- Includes a USB Type-C connector which was a non-negotiable for me.
- From an aesthetics perspective, the board looks really good and the color scheme fits in well with my case. It also has a few RGB LED headers you can use.
Ram: Corsair 1x8GB DDR4 2400MHz
- I plan on adding another 1x8 GB stick in the future, but this suffices for now.
- Upon researching the different RAM speeds, it appears to make small performance improvements at 2800MHz + but I opted to stay away for now.
- There are cheaper 1x8GB sticks out there from other brands, but I decided to go with Corsair’s tried and tested model for my own sanity’s sake and pay the extra $15.
HDD: Samsung 860 Evo 250GB 2.5” SATA III
- I wanted a smaller drive to run my Linux system, and for the NAS storage options I talked about in the future, I plan on getting WD 2TB red drives.
- This is the first SSD I’ve installed myself, and they are incredibly light, thin and cheap. SSD technology has come a long way since prices 10 years ago.
- This is a fully modular power supply, if you care about cable management, it’s worth the cost.
- EVGA has great customer service and a 10 year warranty, make sure to register your product.
- It includes an ECO mode that helps with silencing the PSU fans and only running as necessary, but not a big selling point for me.
Case: Cooler Master HAF XB EVO ATX Desktop
- I didn’t want a tower build, but a more boxy build like the EVO.
- It is incredibly spacious, and makes it easy to route cables with zip tie loops throughout the case.
- Easy access to the motherboard makes it simple to service or modify if you keep it on your desk. The top and both side panels are removable to allow all encompassing access.
WiFi PCIe Adapter: Gigabyte GC-WB867D-I
order of operations
When looking up how to build your own PC, you’ll find pretty similar high level instructions for component order and what to do. There are always smaller details like test booting and other miscellaneous items that seem to fall through the cracks, so I thought I’d record what I did for next time. I am by no means a build expert, so I defer to professional opinions if you find conflicting information. This is simply a record of my particular build.
As most guides out there suggest, fully read through the list twice, before removing a single item from packaging. If this is your first build, cross-check it with other online resources if your parts are significantly different from mine. Manuals are also your friend, I highly recommend reading each manual for your motherboard, case, GPU and PSU with the priority being in that order. Every build is different, and this is one case where it pays to read the manual before starting to jam parts together.
One final note, I did not test-boot my motherboard while it was outside of the case before the power and reset switches from the case were connected. I am not experienced enough to understand how to manually power off the motherboard so I opted not to do this as many experts recommend. My method is more time-consuming if you misconfigured your motherboard and have to debug it once it’s in the case, but for me it was the safer option.
WARNING - these steps do not include GPU installation, so please read your manual if you are installing a GPU.
-
Install CPU onto the motherboard. If this is your first time, please watch some YouTube videos for your specific processor installation to make sure you don’t damage your CPU. The CPU is delicate, and there is room for error here if you aren’t careful. If you are using the same CPU as I am, I recommend this particular install video.
-
Mount CPU fan to the motherboard. My build uses the stock cooling fan for the Ryzen 3, and already includes thermal paste. I again recommend watching YouTube videos for your specific cooler for mounting instructions and using thermal paste. Don’t forget to attach the CPU fan power cable to the motherboard as specified in the manual.
-
Install RAM on the motherboard. Make sure you carefully read your motherboard manual to understand the mounting location. For example, I was only installing 1 stick of RAM, and its spot was in the 2nd from the left. Not the most intuitive, so always read the manual.
-
Install PSU to the case. At this point before the motherboard is installed, I recommend making sure that you attach all the power cables you need so that you don’t have to dig under the motherboard later once it has already been mounted and there is limited space. In my case, I needed the MB cable, the CPU cable, one SATA power cable and one peripheral power cable for the front fans.
-
Install the standoffs to the motherboard mount. Mount the motherboard to the standoffs for a standard ATX motherboard. Refer to the case manual on specific instructions on how to do this. The HAF XB EVO has a removable mount that makes it easy to do this without having to fit your motherboard in the case yet.
-
Place the IO shield for your motherboard inside the case in the standard back slot. Make sure that it’s oriented correctly before pressing it in.
-
Install the motherboard mount to the case, but only screw in a couple screws so that it’s secure, but not too hard to remove later if necessary.
-
Read the motherboard and case manual to figure out how to attach the power and reset switches to the mother board. Optionally attach the Power and HDD LED’s if you are confident.
-
Plug in the power cable, flip on the PSU switch and try turning it on. Your CPU fan should come on and some LEDs on the board will light up. The B450 board I used includes some easy debug LEDs that can tell you if you are having CPU, RAM, VGA or boot issues. Once you see the BIOS come up, you made it!
-
If you successfully test boot, power off the system, turn off the PSU and fully unplug the PSU before starting to work on it again.
-
I mounted the SSD in the back HD mount of the case. The case I was using has 2 hot swappable drive mounts in the front, but I didn’t want the primary boot drive to be easily removed. Carefully read your case manual about how to mount a 2.5” drive, usually there are adapters that make HD mountings compatible with both 2.5” and 3.5” drives.
-
Connect the SATA connectors to SATA1 on the motherboard, and connect the PSU SATA cable to your drive.
-
Connect the front USB 3 cables and audio cables to the motherboard. Again, this is always specific to each motherboard and case, so I highly recommend reading both manuals to ensure proper connections.
-
Connect any external fan power cables to your motherboard or PSU. Manuals come in handy as always!
-
Once I was able to boot and test that the system was stable, I then installed my PCIe adapter for wireless networking.
At this point, your computer is all set for you to begin booting up your particular OS boot drive if you have that ready. I recommend waiting to zip tie and organize cables until the very end of the process, but that’s up to you. If you didn’t fully mount the motherboard or PSU with all 4 screws, I highly recommend you do that now.
Linux Install
I have the most experience with Ubuntu so I decided to go with the Ubuntu 18.04.1 LTS release. There are many guides that go over setting up bootable drives so I won’t rehash those here. I was able to boot from my USB drive easily and go through the standard Ubuntu install without much effort.
Things only got tricky once I started rebooting my computer for the first time. I would get a purple splash screen… and then nothing. Upon further investigation, it looked to be an issue with support for the AMD Ryzen 3 processor with on-board graphics. AMD has not released any official driver support for Linux, and I have not been able to find well-supported community drivers either. The only thing I’ve found searching across different forums and threads is the hint that the newer Linux kernels (4.17+) have better support for AMD GPUs.
I decided to use a utility called UKUU to help manage the kernel upgrade. Once installing kernel 4.20, I rebooted and have not had any issues with the AMD on-board graphics GPU getting recognized. To get to the point where I could even install UKUU and utilize the system, I had to manage the GRUB boot settings to manually force it to not attempt to use a GPU.
In the GRUB loader, selected Advanced options for Ubuntu, then click e on the
default loading configuration to edit it. You should see a line that has
something looks like this:
ro quiet

# change it to:
ro nomodeset quiet
You can use CTRL + X to be able to boot with your modified entry. The system
should boot fine, but you’ll notice that the resolution will be poor, but it’s
enough to get what we need done. At this point, you can install UKUU and then
load the 4.20 Linux kernel, reboot and you should be able to properly use your
new system.
Lessons Learned
As this was my first build in quite a while, I made some mistakes and learned some things that I either forgot or hadn’t experienced before.
- Don’t forget to put your IO shield in early, I forgot to do this and had to move the motherboard late in the install after all the cables were plugged in.
- Connect all the PSU cables you need if you have a fully modular PSU. You can route them out of the side of the case temporarily to preserve space, but it’s much easier to do it earlier than later once your motherboard is in.
- Have a USB keyboard and mouse available. I have been using Bluetooth keyboards for so long that I had to find an old one in storage.
- Research driver support early, before you buy components. In my case, it worked out that the later Linux kernel supported my integrated graphics card. In hindsight, I should’ve known there might’ve been potential compatibility issues before I bought the parts.
configuration management
In the spirit of making my builds repeatable and to prevent headaches when building future machines, I wanted to put as much configuration as possible into version control of some sort. I have the most experience with Ansible, so I decided to create an Ansible playbook for the machine.
I’ll highlight the process in more detail in another post one day, but for now the only dependency I had to install before running my playbook was ansible itself. The initial steps are highlighted below:
$ sudo apt-get install software-properties-common
$ sudo apt-add-repository ppa:ansible/ansible
$ sudo apt-get update
$ sudo apt-get install ansible git
Once ansible was installed, I cloned my repo that contains my configs, circlefiles. I then run my ansible playbook to ensure that the machine state is up-to-date.
$ ansible-playbook piper_home.yml --ask-sudo-pass
Using those ansible playbooks, you can then add whatever modules you need or want installed. I also use my playbooks to copy my vim config dotfiles, bashrc files and more. If you want to see the latest one that I use on this machine, you’ll see it on the master branch on my circlefiles repo. The goal is to not just run commands when configuring and setting up packages, but to put it all in version control, so it’s easy to set up new systems if the need arrives. Two years later when you’re trying to remember what you did, you’ll appreciate the detail.
stability and burn-in
Now that my system was set up, I wanted to test for reliability and make sure that there were no obvious stability issues. From my research, I came up with two different tests for the CPU and memory. prime95 is a common tool that can be used to push a CPU to its limits. memtest86 can also be used to thoroughly test your RAM to make sure that there are no damaged areas.
memtest86
Memtest86 is a utility that can be run from inside your existing OS or from a bootable USB drive. I opted to do the latter, as it allows for your RAM to be fully tested. From my understanding, when memtest is run from a running OS, it can’t access all the RAM addresses possible. When run as a bootable drive, it can fully test all of your RAM for any errors.
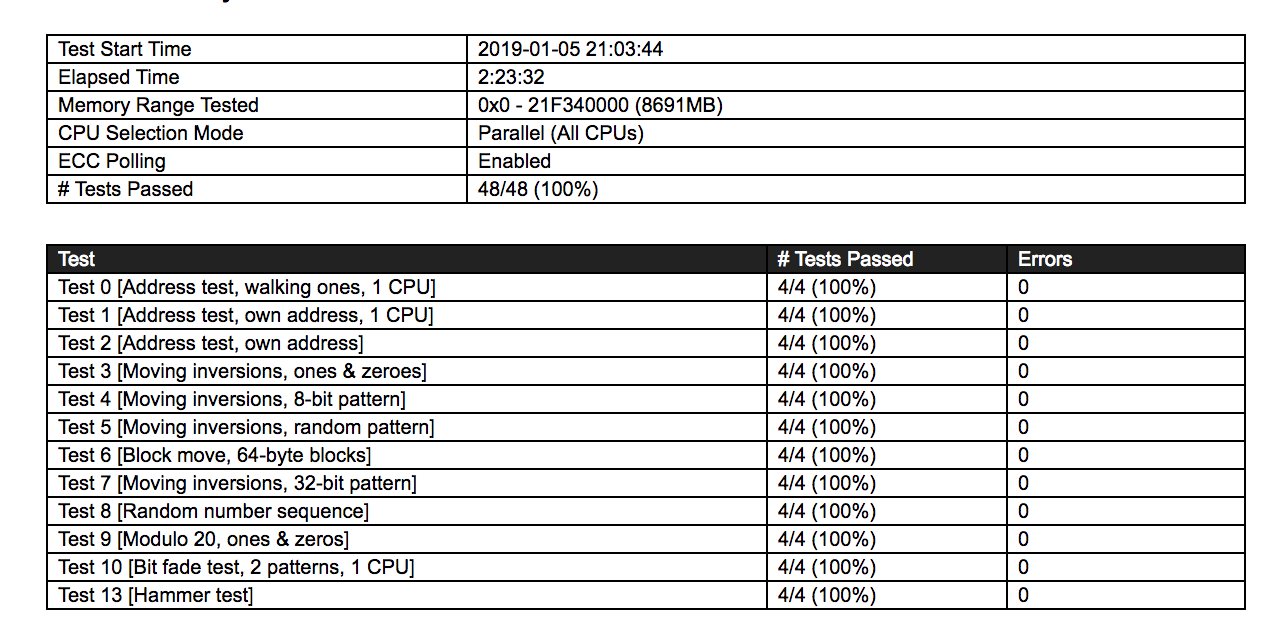
You can see the results from my memtest run above. By default, it goes for four full passes and runs each test four times. For my 8GB stick, it took a little under 2.5 hours to complete.
prime95
prime95 is a software that calculates prime numbers, but has evolved into a program used by system builders to test stability of their systems. prime95 is computationally intense, and can push your entire system’s limits. MPrime is the specific Linux version that we will use. I based my test off of Jeff Atwood’s blog post on system reliability, so if you are curious about the details, I would read that first. The only difference is that I use another tool to help monitor my CPU temps, as I’m running an AMD processor and not an Intel series CPU. If your computer can run it overnight without mprime crashing, you should be all set.
backup and storage
The final step that I wanted to setup at the beginning was automating periodic backups of my user directories. There are dozens of backup tools out there, but I am most comfortable with a tool called restic. To start, I just want to backup my home directory once a week to a remote S3 bucket that I’ve already configured.
I’ve setup a cronjob that runs weekly that uses restic to create snapshots of
my /home and /var directories and stores the encrypted snapshots on S3.
It’s not very complex and wouldn’t handle a full system restore if I needed it, but at the very least I know I will have my user data backed up if anything goes wrong. If backups aren’t easy, you won’t ever backup your data, and using a tool like restic removes a lot of the friction.
last thoughts
If you’ve stuck around this far, you’ve seen the entire life-cycle of a new desktop build. Setting up a Linux system definitely requires a few more tweaks here and there, but if you’re looking for a free and reliable system you can use for local development and browsing, I highly recommend Ubuntu 18.
Lastly, this new desktop is only a couple weeks old and there will be lots of things to iron over the coming months and years. There are many more things I would like to experiment with this computer, and I plan on documenting those projects as the need and time arises.