Configuring SSH keys for Linux Servers and Github- 2016
Once you have a Linux server up, it’s important to get your SSH key authentication set-up. When you set up a server with Digital Ocean, you will use your root password to connect to the server your first few times, but don’t make a habit of it. I won’t go into why public key pair authentication is more secure here, but you can read a bit more in this helpful stack exchange conversation. Before we get started going into setting up your SSH keys, let’s look at how SSH key authentication works in the first place.
A SSH key pair consists of two keys that are used to authenticate client connections to remote SSH servers. A key pair consists of two parts, a public key and a private key. The public key can be shared without worry about security - it is public as its name implies. By themselves, these keys are useless without their private counterparts. Public keys are used to encrypt messages that only their respective private keys can decrypt, nothing more.
On the other hand, private keys must be kept secure and secret. These keys are kept by the client and are used to decrypt messages in the SSH key handshake. If a hacker obtains your private key, the hacker will be able to access any server with it’s public key counterpart. Additionally, you should always encrypt your private key on your local machine with a passphrase but more on that later.
Here is a diagram that illustrates at a high level how these keys are used:

The transaction to authenticate the user is pretty simple, and the keys are never passed over the network to do it. It simply depends on the cryptographic security of the key-pair to ensure the client is who the server thinks it is.
As you can also tell from the above, your personal SSH key-pair can be used to
access multiple servers. As long as you put your public key in the
authorized_keys file of the user you want to connect as, you won’t have any
more configuration work. We’ll see what this looks like as we step through the
setup process.
Creating your SSH keys
The responsibility of creating an SSH key pair falls to the remote user, the
client. These next set of instructions will pertain only to this process, and
all should be run on your local machine. There is a utility called ssh-keygen
that should already be installed. Run it like this:
ssh-keygen
You’ll be given a prompt that looks like the following:
Generating public/private rsa key pair.
Enter file in which to save the key (/home/username/.ssh/id_rsa):
This prompt asks you where you would like to have your key pair stored, and
this default location is usually just fine. SSH configuration info is by
default stored in the ~/.ssh directory. Unless you changed the name of the
key, the the private key will be named id_rsa and its public key
id_rsa.pub. If you decide to change this, you will have some extra
configuration work to get your SSH client to find the keys.
As a note, if you already have a private/public key pair in your ~/.ssh
directory, it will ask you if you want to overwrite the old one. Do not do
this unless you are ok with nullifying your existing SSH access to servers.
Created directory '/home/username/.ssh'.
Enter passphrase (empty for no passphrase):
Enter same passphrase again:
The next prompt will ask you for a passphrase for your key pair. This is optional, but it is highly recommended. Using a passphrase for SSH does not detract from the security benefit SSH gives. A passphrase is used only locally to decrypt the the key to be used in the process described above. The passphrase or the private key are never passed across the network, as your password is when using password authentication with SSH.
At this point, you are done! You should have an id_rsa and id_rsa.pub file
that can now be used to connect to servers.
Adding a public key to your server
Now that your key pair has been properly set up, it’s time to get your public
key on the necessary server. You can use a utility like [ssh-copy-id][sci], but
MacOSX doesn’t have it installed, so we’ll do it using cat and
ssh. I assume here that you have password-based SSH access to the server.
The following command is a little complex, but I’ll explain. The cat
command spits out the contents of id_rsa.pub and pipes it to the ssh
command. ssh connects to your remote server before running the command in
quotes. mkdir makes sure that the ~/.ssh directory exists, and then the
cat usage then appends the public key to the authorized_keys file.
cat ~/.ssh/id_rsa.pub | ssh username@remote_host "mkdir -p ~/.ssh && cat >>
~/.ssh/authorized_keys"
You may be prompted to type yes if it asks if you are sure you want to
connect. This should be the last time you have to answer this prompt.
Connecting without a password
Now that your public key is on the server, you should be able to SSH into the box without being prompted for a key. Simply run the following command:
ssh username@remote_server
If you used a passphrase, you have to enter it in order to decrypt your private key. Rest assured, this is never passed over the network. If it does prompt you for the password, that means something went wrong in the process. Feel free to ask me here, or check out this helpful article on debugging ssh auth problems.
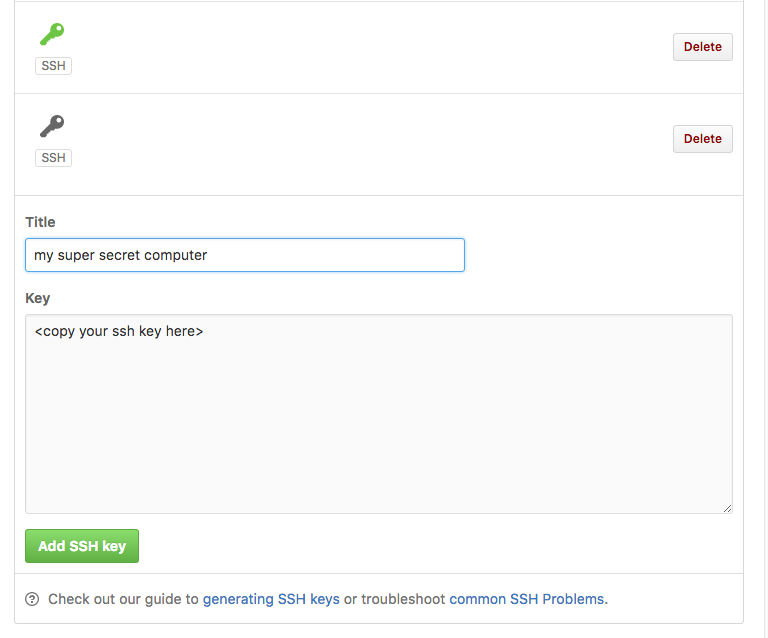
Adding a public key to Github
If you haven’t set up your SSH key with github yet, now is as good a time as
ever. You can simply cat ~/.ssh/id_rsa.pub, copy that output and take it to
your Github settings.
After that, you’re all set with your local computer! Now that you understand
how this process works, you can use it for any other servers or computers you
want to access. Remember, you can copy your public key to as many servers as
you’d like to get access to from your own computer, your private key will work
with any of them. If you want to connect to a server from a different
computer, then I recommend you run through the ssh-keygen steps as
highlighted above.
If something doesn’t work for you, please let me know below and I’ll help you out!