Setting up firewalls on Ubuntu 14.04 with UFW
Firewalls. They can be confusing, mystifying, and annoying especially when you’re trying to get a game set up for a LAN party. Today we’re going to look into how firewalls can be used to block potentially dangerous external traffic on your Ubuntu instance.
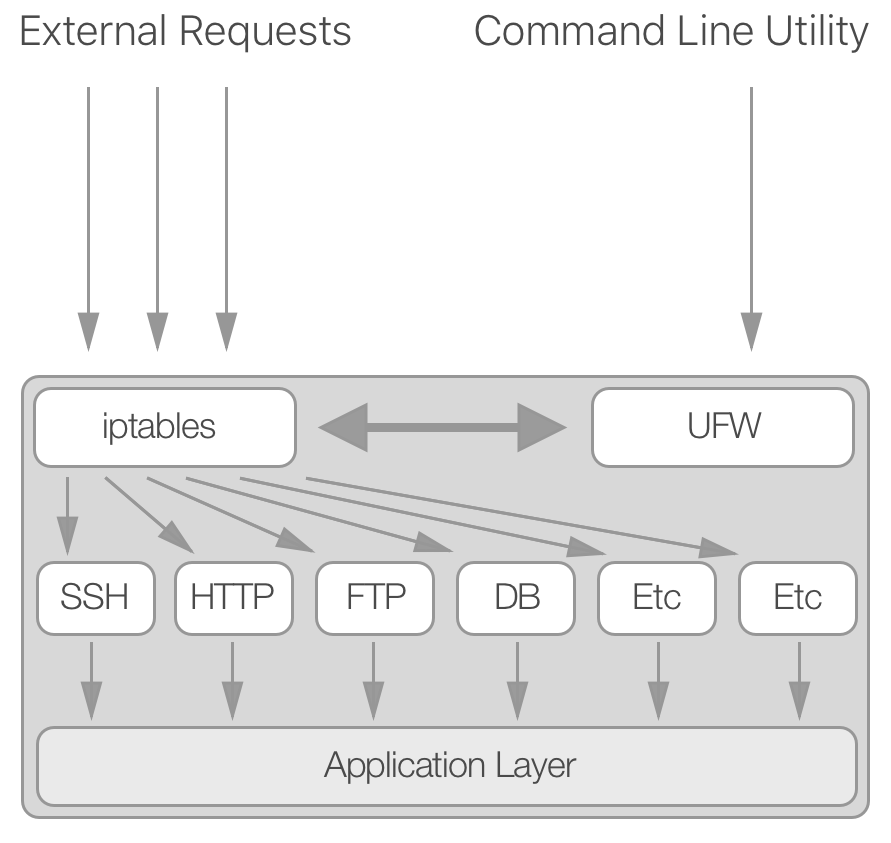
At the core of packet filtering in Ubuntu lies a program called
iptables. iptables is incredibly configurable, but it’s often
easier to be dangerous rather than effective at the beginning. Fortunately
for you, there is a utility named ufw that wraps around iptables to make it
easier to understand and modify. Its name is an acronym for Uncomplicated
FireWall, but most refer to it as UFW. While UFW is not responsible for actually
blocking packets (iptables still is), it simplifies the commands needed to
manipulate iptables for you. The following diagram explains how the utilities
work together to help filter out unnecessary traffic.
Configuration
ufw truly lives up to its name and is easy to set as we’ll see in
just a bit. First, let’s check the status of your firewall by running the
following:
sudo ufw status
More likely then not, it will tell you that it is inactive. If it is active, it will
give you a list of the current firewall rules that we’ll go over soon. In the
rare case that ufw is not already installed on your machine, run the
following and you’ll be golden:
sudo apt-get install ufw
Your machine is most likely configured to support IPv6, so let’s make sure that
ufw can handle it too. Open the configuration file like this:
sudo vim /etc/default/ufw
In that file, search for the line beginning with IPV6 and make sure the config line looks like this:
IPV6=yes
From there, you only need to restart ufw by running sudo ufw disable and
sudo ufw enable.
Setting Firewall Rules
Now that UFW is up and running, it’s time to set up the rules for internet traffic. It’s better to deny all incoming traffic by default, and slowly open up ports as necessary so that you consciously choose your attack vectors. Luckily this is the default for UFW, so there is no work to do here. If you are curious, this is the command to deny all incoming packets:
sudo ufw default deny incoming
Next, we want to start enabling certain connections that are necessary for the average server. SSH access is probably the most important, so let’s start there. The command to allow traffic on port 22 (the default port for SSH) is pretty intuitive:
sudo ufw allow 22/tcp
This command simply allows TCP packet traffic on port 22. If your SSH port is
different for whatever reason, modify the command accordingly. UFW has several
defaults that you can use, for example sudo ufw allow ssh. Since those rely
on default application ports, in this tutorial we’ll avoid those.
Let’s enable a couple more useful services before we verify our installation. To allow http traffic, run the following:
sudo ufw allow 80/tcp
Next, it’s good to open your FTP port in case you need to transfer files in the future, so let’s open up port 21.
sudo ufw allow 21/tcp
Testing it out
Your new firewall has now been configured to handle the most sane defaults, so
let’s see verify that we set it up correctly. If UFW is not already enabled,
run sudo ufw enable to make sure it turns on the firewall. Now you should be
able to run the status command to see the output:
sudo ufw status
It will print out a table of the current firewall rules. If you enabled IPv6, you’ll see two entries for each rule you created to support both IPv4 and IPv6. It should look something like this:
Status: active

To                         Action      From
--                         ------      ----
80/tcp                     ALLOW       Anywhere
22/tcp                     LIMIT       Anywhere
21/tcp                     ALLOW       Anywhere
80/tcp (v6)                ALLOW       Anywhere (v6)
22/tcp (v6)                LIMIT       Anywhere (v6)
21/tcp (v6)                ALLOW       Anywhere (v6)
If it looks something like that, you should be all set! Your server is now secured for the rules that you allowed. Before you log out of your remote server, now would be a good time to check that you can still SSH into your machine. Open up a new terminal window and quickly verify that you didn’t accidentally block your ability to control your server. It’ll save you a bunch of potential headaches.
What’s Next
You have the basics of UFW down, and you should be able to extend and control your firewall as you build new applications, require more ports, etc. Before you go, here are a couple of areas that I haven’t explained that might be useful in the future:
- using ufw to restrict traffic to and from IP addresses - if you search this, you will find some helpful tutorials on how to do this.
- if you are using AWS servers, and you are having problems with connecting, you might be hitting the EC2 network firewall (outside of the machine). In that case, you’ll need to modify your security groups to allow traffic for those ports, as well as configure UFW.
- learning more about iptables - if you are trying to perform advanced network
operations, such as operating a NAT server or something similar, you’ll have
to get into the nitty gritty of
iptables. Good luck!