Homelab Log: #002
Home Security Camera Network
I recently set up the first service for my homelab, a ZoneMinder server that is recording and saving data from a couple of POE cameras.
Physical Installation
For the physical installation perspective, I purchased 500ft of Cat6 outdoor rated cable to run along the outside of our home inside plastic PVC conduit. Our home is not new construction, and didn’t have any sort of structured wiring installation. Given that I don’t want to tear out the drywall in our home, I decided to run the conduit along an exterior wall, out of view.
From my office, I drilled 1” holes to the exterior and fit PVC conduit through those holes to junction boxes similar to these. Given that our length of exterior wall is quite long (at least 120ft), I put several junction boxes at key points for future use, so I can expand the network with more cameras and access points as necessary. I purchased PVC conduit in the standard 10ft lengths, and glued and cut to size pieces as necessary. Instead of going with 3/4” conduit, I went with 1” for more cable space if required in the future.
I only had a maximum of 180 degrees of turns in each stretch, so pulling the wire wasn’t difficult, and didn’t require any special tools. All cables were terminated at specialty junction boxes that fit my specific Armcrest cameras. From there, I used an Ethernet cable tester to verify cables were all working, and moved onto configuring the network.
Network Setup
Once the physical installation was done, I moved on to setting up my ZoneMinder server and switch to handle the new traffic. I’ve included a basic diagram below that outlines the current state of the network.
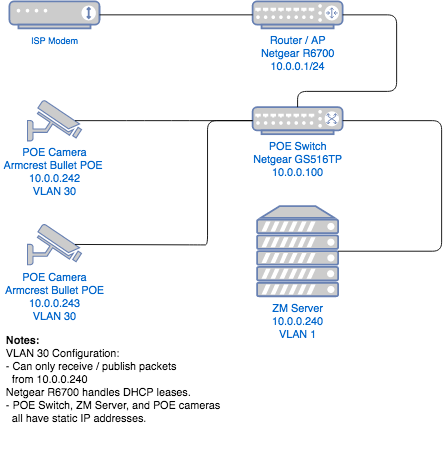
I had an old PC lying around that I reconfigured as an Ubuntu machine and installed ZoneMinder. To power the switches and handle packet routing, I am using a Netgear GS516TP Managed Switch. It powers the cameras, and connects my main router and ZM server so that I can review footage from any device at home.
I used the managed functionality of my switch to set up a VLAN specifically for my POE cameras. I set up an ACL to only allow devices in that VLAN to communicate with the ZM server by using the service’s static IP address.
In the best case, security cameras often have firmware from the manufacturer that will ‘phone home’ and send basic usage data. In the worst case, a compromised device on my network could be used to access camera data and expose it to the outside world. By isolating the traffic this VLAN allows, it narrows my surface area for attack to just the ZM server. As long as I perform regular security updates and keep that server up-to-date, I can be confident my camera data won’t be compromised.
Next Steps
Given my timeline to finish this project, there were a few things I had to leave as-is in the interest of getting this V1 of the system up and running.
I’d like to setup a proper server rack that gives me space to install my switch and patch panels for more reliable and cleaner cable management. Right now, the corner of my office is a mess and leaves a lot to be desired.
Next up is purchasing a real server such as the Dell R710 so I can begin virtualizing my internal services and not require inefficient hardware for my experiments. My old PC running ZM is loud, power hungry and lacks the ability to easily manage and monitor it, something that a hypervisor like ProxMox would offer.
Finally, I have Ethernet cables outside my home that could be prone to lightning strikes or other interference. To prevent something from frying my expensive internal hardware, I need to install Ethernet surge protectors on each incoming line to isolate my homelab.